
How to Use Reference Images in Seedance 2.5
Attach two to four photos and Seedance 2.5 switches to reference to video. Here is how to pick the photos and bind each one with @Image1 to @Image4 so your creator and your product never blend.
Seedance 2.5 reference to video is the mode that runs when you attach two, three or four images to a prompt on VIDEO AI ME, and it exists to solve one specific problem: getting the same person and the same product into a generated shot without either of them being reinvented. You do that by addressing each image directly in the prompt as @Image1, @Image2, @Image3 and @Image4, and telling the model exactly what each one contributes. This walkthrough covers photo selection, the binding syntax, and the settings that go with it.
What is Seedance 2.5 reference to video?
There is no mode dropdown in the editor. The mode follows the number of reference images on the prompt:
| Reference images attached | Mode |
|---|---|
| 0 | Text to video |
| 1 | Image to video, animating that image as the start frame |
| 2 to 4 | Reference to video |
So reference to video is not something you switch on. You get it by attaching a second image. The important difference from image to video is what the images are for. In image to video the single image is the literal first frame of the clip, and the video starts from it. In reference to video the images are sources of identity, not frames. The model takes the face from one, the product from another, and composes a new shot that contains both, in a setting and a camera position you describe.
Reference to video costs the same per second as the other two modes: 23 credits per second at 480p and 48 credits per second at 720p, with audio included.
Step 1: Pick reference photos the model can actually use
The quality ceiling of the clip is set here, before you type anything. In our runs the reference photos that work share the same properties.
For a person:
- Face clearly visible, roughly front on or three quarter, eyes open, no sunglasses.
- Even light. Hard shadow across half the face gets baked in as a feature.
- Head and shoulders at minimum, ideally waist up, so the model has the wardrobe too.
- One person in the frame. A group photo forces the model to guess which one you mean.
- Neutral or simple background. A busy background sometimes leaks into the generated set.
For a product:
- A clean pack shot on a plain background, label facing the camera and readable.
- The whole product in frame, not cropped, not held at an angle that hides the shape.
- Real photography where you have it. A photo of the actual bottle beats a render of it.
- If the label has small text, use the highest resolution version you have. Fine print is the first thing to go soft.
If you do not have this kind of photography yet, it is worth fixing before you generate. The basics in the Shopify guides on product photography apply directly, because a reference photo is judged by the model on roughly the same criteria a customer judges it on: is the thing legible, and is it lit.
Step 2: Attach two to four images so the mode switches to reference to video
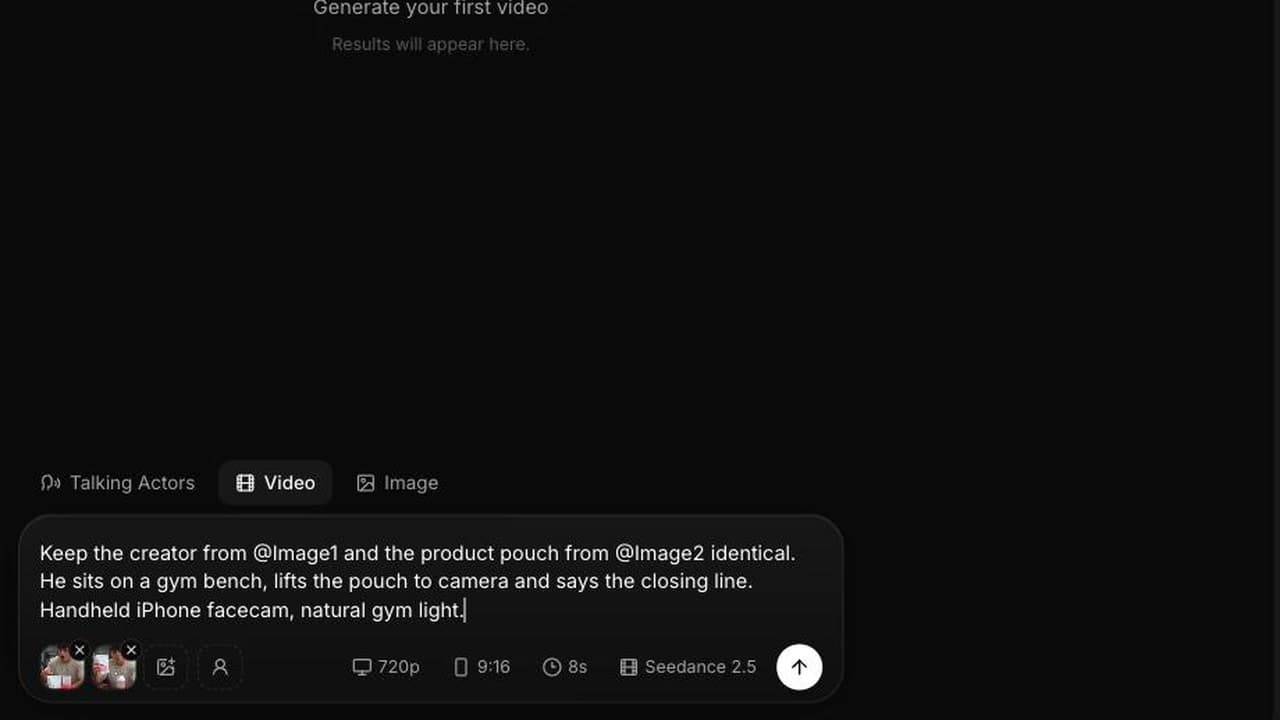
Open the editor at videoai.me, pick Seedance 2.5 in the model picker, and attach your images to the prompt. As soon as there are two or more, you are in reference to video. Attach the person first and the product second if you can, because it makes the numbering easier to keep straight in your head: @Image1 is the person, @Image2 is the product.
Four is the maximum. Most working prompts use two. Three is common when you also want to pin a location or a style plate. Four is worth it when you have two people plus a product plus a set, and it is where prompts start needing real discipline, because every extra image is another thing the model can confuse.
Step 3: Bind each image with @Image1 through @Image4
This is the step people skip, and it is the step that decides whether the output is usable. Attaching images without addressing them in the prompt leaves the model free to average them together. You get a person who is slightly the product's colour, or a bottle wearing the creator's cardigan tones.
Bind explicitly. Name the image, name what to take from it, and name what to keep unchanged.
Weak, and the reason most first attempts blend:
The woman holds the product and talks about it in a kitchen.
Strong, written for reference to video, 8 seconds, 480p, 9:16, which costs 184 credits:
Keep the woman from @Image1 exactly as she appears: same face, same shoulder length dark hair, same cream ribbed jumper. Keep the over ear headphones from @Image2 exactly as they appear: same matte black finish, same brushed metal band, same logo placement on the earcup. She stands at a kitchen island in the late afternoon, lifts the headphones with both hands, settles them over her ears, and tilts her head slightly as the sound comes in. Medium shot at chest height, 50mm, shallow depth of field. Warm low sun through a window behind her, soft rim light on the headband, natural grade. Ambient kitchen room tone, one soft click as the headphones seat, no music, no dialogue. Photoreal, 9:16.
Three habits are doing the work there. Every image gets its own sentence. Every binding says "exactly as they appear" and then lists the two or three attributes that must survive, which gives the model something concrete to hold. And the person and the product are never referred to jointly until after both have been bound.
Step 4: Write the shot around the bindings
Once the bindings are in place, the rest of the prompt is an ordinary shot description: action, camera, light, audio, format. Keep it in that order, after the bindings, and do not go back and re-describe the subjects. Re-describing is how contradictions get in. If @Image1 has dark hair and a later sentence says "the blonde presenter", you have handed the model a conflict to resolve and it will resolve it however it likes.
Here is a three image version, for reference to video, 12 seconds, 720p, 16:9, at 576 credits:
Keep the man from @Image1 exactly as he appears: same face, same short beard, same navy chore jacket. Keep the espresso grinder from @Image2 exactly as it appears: same stainless body, same wooden hopper lid, same dial markings. Use the cafe interior in @Image3 as the setting: same exposed brick, same pendant lights, same counter finish. He steps up to the counter, sets the grinder down, turns the dial two clicks and runs it, watching the grounds fall into the basket. He nods once, satisfied, and taps the basket flat. Slow push in from a wide to a medium over the twelve seconds, 35mm, eye level. Warm pendant light overhead, cool daylight from the street behind him, natural grade with rich shadow. Ambient cafe murmur, the grinder running for three seconds, two sharp taps at the end. No music. Photoreal, 16:9.
Notice that @Image3 is bound as a setting rather than an object, with the same "same X, same Y" pattern. Anything you can photograph you can bind: a person, a product, a room, a printed style plate.
Step 5: Set duration, resolution and aspect ratio, then test at 480p
Reference to video honours the aspect ratio picker, so choose it deliberately: 9:16 for TikTok, Reels and Shorts, 16:9 for YouTube and site embeds, 1:1 for feed. This is different from image to video, where the aspect ratio always follows the input image and the picker does not apply, which is covered in the image to video walkthrough.
Then pick a duration from 4, 8, 12, 15, 20, 25 or 30 seconds and run the first version at 480p. Identity is fully judgeable at 480p. You can see immediately whether the face held, whether the label is the right label, and whether the two subjects stayed separate. At 23 credits per second, an 8 second identity test is 184 credits against 384 credits for the same test at 720p, so you can afford three or four attempts at the binding before you commit to the final render.
When the bindings are right, re-render that exact prompt at 720p. Change nothing else in the same pass, or you will not know which change fixed it.
When does Seedance 2.5 reference to video beat image to video?
Use image to video when you already have the exact first frame you want and the job is to make it move. A finished pack shot, a hero still, a generated frame you like.
Use Seedance 2.5 reference to video when the shot you want does not exist as a photograph yet, but its ingredients do. The creator exists. The product exists. The shot of the creator holding that product in that kitchen does not, and photographing it would mean a shoot. That is the whole case for the mode, and it is why it matters most for ecommerce and user generated style ads, where you need the same face across a dozen variants and the same label in every one of them. The product ad prompt collection has more finished examples in that shape, and if you worked this way in the previous model, the Seedance 2.0 character consistency guide covers what changed.
What the model does that the product does not expose
Worth being precise about, because the launch coverage mixes the two. The Seedance 2.5 model itself also accepts video references and audio references, and a larger number of reference images than four. On VIDEO AI ME today you get text to video, image to video, and reference to video with up to four images, at 480p or 720p, from 4 to 30 seconds, with audio generated on every run. Everything in this walkthrough is written against what is actually in the editor. Model level research notes are published by ByteDance Seed if you want the underlying detail, and broader platform documentation sits at BytePlus.
For the wider tour of the model in the editor, start with how to use Seedance 2.5, and for the sentence level craft that sits underneath every prompt above, see the Seedance 2.5 prompt guide.
Frequently Asked Questions
How many reference images can I attach in Seedance 2.5?
Up to four on VIDEO AI ME. Attaching two, three or four puts the generation into reference to video mode. Attaching exactly one is image to video instead, where that image becomes the first frame of the clip, and attaching none is text to video.
What does @Image1 mean in a Seedance 2.5 prompt?
It is how you address a specific attached reference inside the prompt text. @Image1 is the first image you attached, @Image2 the second, and so on up to @Image4. Writing "the woman from @Image1" tells the model which reference to take that subject from, instead of leaving it to average them.
Why did my person and my product blend together?
Because the prompt referred to them jointly before binding them separately. Give each image its own sentence, say "exactly as they appear", and list two or three attributes that must survive. Only refer to them together once both bindings are written.
Does reference to video cost more than text to video?
No. All three Seedance 2.5 modes cost the same per second: 23 credits per second at 480p and 48 credits per second at 720p, with audio included and no surcharge. An 8 second reference to video clip at 480p is 184 credits regardless of how many images you attached.
What makes a good reference photo?
Even lighting, the subject unobstructed and roughly front on, one subject per photo, a simple background, and the highest resolution you have. For products, a clean pack shot with the label readable and the whole item in frame. Hard shadows and busy backgrounds tend to get treated as features of the subject.
Can I use a photo of a room or a style as a reference?
Yes. References are not limited to people and products. Binding a location works the same way: "use the cafe interior in @Image3 as the setting, same exposed brick, same pendant lights". Treat any reference as something to be named, described and held constant.
Frequently Asked Questions
Share
AI Summary
Paul Grisel
Paul Grisel is the founder of VIDEOAI.ME, dedicated to empowering creators and entrepreneurs with innovative AI-powered video solutions.
@grsl_frReady to Create Professional AI Videos?
Join thousands of entrepreneurs and creators who use VIDEO AI ME to produce stunning videos in minutes, not hours.
- Create professional videos in under 5 minutes
- No video skills experience required, No camera needed
- Hyper-realistic actors that look and sound like real people
Get your first video in minutes
Related Articles
How to Run MiniMax H3 Without a GPU
MiniMax H3 has public weights, so people try to self host it. Here is what that actually costs in hardware and time, and the browser route if you just want the clips.
Writing Sound and Dialogue in MiniMax H3 Prompts
Audio is generated with the picture, so it is yours to direct. How to write dialogue, ambience and silence, and how much speech actually fits in a short clip.
MiniMax H3 Prompt Guide: How to Write a Shot
The five part structure that gets usable clips out of MiniMax H3, why keyword lists fail, and how to write the sound as deliberately as the picture.